Make Custom Image Slider Using HTML CSS and JavaScript | Devhubspot
In this blog is for you! We'll show you how to create a slider using HTML, CSS, and JavaScript, and then walk you through the steps step by step. If you're new to HTML, CSS and JavaScript, then this video is a great place to start.
Steps For Creating a Slider Application
To create a slider using HTML, CSS, and vanilla JavaScript, follow the given steps line by line:
- Create a folder. You can name this folder whatever you want, and inside this folder, create the mentioned files.
- Create an
index.htmlfile. The file name must be index and its extension .html - Create a
style.cssfile. The file name must be style and its extension .css - Create a
script.jsfile. The file name must be script and its extension .js
To start, add the following HTML codes to your index.html file to create a basic layout for the To-Do.
<!DOCTYPE html>
<html>
<head>
<meta charset="UTF-8">
<meta http-equiv="X-UA-Compatible" content="IE-edge">
<meta name="viewport" content="width=device-width. initial-scale=1.0">
<title>Image Slider html, css & javascript | Devhubspot</title>
<link rel="stylesheet" href="./style.css" />
<link rel="stylesheet" href="https://cdnjs.cloudflare.com/ajax/libs/font-awesome/6.2.0/css/all.min.css" integrity="sha512-xh6O/CkQoPOWDdYTDqeRdPCVd1SpvCA9XXcUnZS2FmJNp1coAFzvtCN9BmamE+4aHK8yyUHUSCcJHgXloTyT2A==" crossorigin="anonymous" referrerpolicy="no-referrer" />
</head>
<body>
<div class="container">
<div id="slider">
<div class="item" style="background-image: url('./images/main-bg.jpeg');">
<div class="content">
<div class="name">Devhubspot</div>
<div class="des">Lorem Ipsum is simply dummy text of the printing and typesetting industry. Lorem Ipsum has been the industry's standard dummy text ever since the 1500s, when an unknown printer took a galley of type and scrambled it to make a type specimen book.</div>
<button>
See more
</button>
</div>
</div>
<div class="item" style="background-image: url('./images/2-bg.jpeg');">
<div class="content">
<div class="name">Spacer</div>
<div class="des">Lorem Ipsum is simply dummy text of the printing and typesetting industry. Lorem Ipsum has been the industry's standard dummy text ever since the 1500s, when an unknown printer took a galley of type and scrambled it to make a type specimen book.</div>
<button>
See more
</button>
</div>
</div>
<div class="item" style="background-image: url('./images/3-bg.jpeg');">
<div class="content">
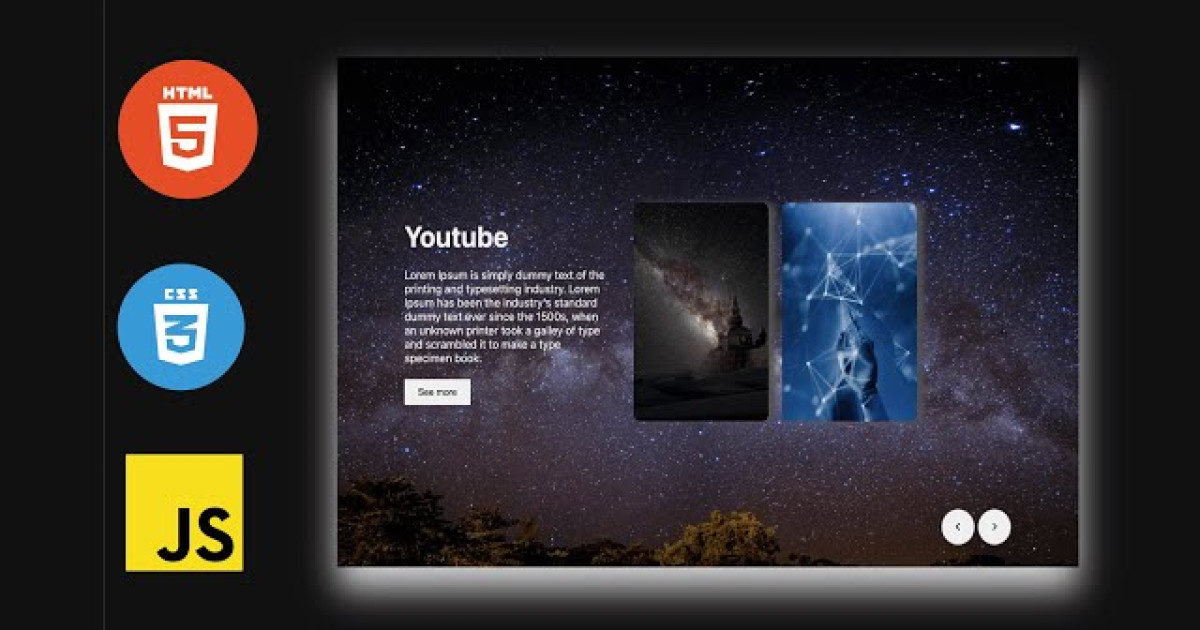
<div class="name">Youtube</div>
<div class="des">Lorem Ipsum is simply dummy text of the printing and typesetting industry. Lorem Ipsum has been the industry's standard dummy text ever since the 1500s, when an unknown printer took a galley of type and scrambled it to make a type specimen book.</div>
<button>
See more
</button>
</div>
</div>
<div class="item" style="background-image: url('./images/ai.webp');">
<div class="content">
<div class="name">Networking</div>
<div class="des">Lorem Ipsum is simply dummy text of the printing and typesetting industry. Lorem Ipsum has been the industry's standard dummy text ever since the 1500s, when an unknown printer took a galley of type and scrambled it to make a type specimen book.</div>
<button>
See more
</button>
</div>
</div>
</div>
<div class="buttons">
<button id="prev">
<i class="fa-solid fa-angle-left">
</i>
</button>
<button id="next">
<i class="fa-solid fa-angle-right">
</i>
</button>
</div>
</div>
<script src="./script.js"></script>
</body>
</html>Next, add the following CSS codes to your style.css file to style the image silder and make it interactive and beautiful.
body{
    background: #111111;
    overflow: hidden;
}
.container{
    position: absolute;
    left: 50%;
    top: 50%;
    transform: translate(-50%, -50%);
    width: 1000px;
    height: 600px;
    padding: 50px;
    background: #f5f5f5;
    box-shadow: 0 30px 50px #dbdbdb;
}

#slider{
    width: max-content;
    margin-top: 50px;
}
.item{
    width: 200px;
    height: 300px;
    background-position: 50% 50%;
    display: inline-block;
    transition: 0.5s;
    background-size: cover;
    position: absolute;
    border-radius: 10px;
    z-index: 1;
    top: 50%;
    transform: translate(0, -50%);
    box-shadow: 10px 0px 10px #505050;
}
.item:nth-child(1), .item:nth-child(2){
    left: 0;
    top: 0;
    transform: translate(0, 0);
    border-radius: 0;
    width: 100%;
    height: 100%;
    box-shadow: none;
}
.item:nth-child(3){
    left: 60%;
}
.item:nth-child(4){
    left: calc(60% - 220px)
}
.item:nth-child(5){
    left: calc(60% - 440px)
}
.item:nth-child(n+6){
    left: calc(60% - 660px);
    opacity: 0;
}

.item .content{
    position: absolute;
    top: 50%;
    left: 100px;
    width: 300px;
    text-align: left;
    padding: 0;
    color: #eee;
    transform: translate(0,  -50%);
    display: none;
    font-family: system-ui;
}
.item:nth-child(2) .content{
    display: block;
    z-index: 111;
}

.item .name{
    font-size: 40px;
    font-weight: bold;
    opacity: 0;
    animation: showcontent 1s ease-in-out 1 forwards;
}

.item .des{
    margin: 20px 0;
    opacity: 0;
    animation: showcontent 1s ease-in-out 0.3s 1 forwards;
}
.item button{
    padding: 10px 20px;
    border: none;
    opacity: 0;
    animation: showcontent 1s ease-in-out 0.6s 1 forwards;
}


@keyframes showcontent{
    from{
        opacity: 0;
        transform: translate(0, 100px);
        filter: blur(30px);
    }
    to{
        opacity: 1;
        transform: translate(0, 0);
        filter: blur(0);
    }
}


.buttons{
    position: absolute;
    bottom: 30px;
    z-index: 22222;
    text-align: right;
    right: 100px;
    width: 100%;
}
.buttons button{
    width: 50px;
    height: 50px;
    border-radius:  50%;
    border: 1px solid #555;
    transition: 0.5s;
}
.buttons button:hover{
    background-color: #dddddd;
}
Finally, add the following JavaScript code to your script.js file to make the dynamic image slider
document.getElementById("next").onclick = function () {
    let lists = document.querySelectorAll('.item');
    document.getElementById('slider').appendChild(lists[0]);
}

document.getElementById("prev").onclick = function () {
    let lists = document.querySelectorAll('.item');
    document.getElementById('slider').prepend(lists[lists.length - 1]);
}
Conclusion
With HTML, CSS, and JavaScript, I am to show you how to create your Custom Image Slider Application. You may modify your generator to suit your demands because the coding procedure is straightforward to grasp.
Result