🔴 Flutter Firebase Auth - The Cleanest & Fastest Way - IOS & Android - Devhubspot
In this blog, we will show you Flutter login and registration using Firebase. In other words. We will show you how to use Firebase Authentication in your Flutter App, so that the user can sign up and after that log in to use your app easily.
What is Flutter?
Flutter is an open-source UI software development kit created by Google. It is used to develop cross-platform applications for Android, iOS, Linux, macOS, Windows, Google Fuchsia, and the web from a single codebase.
What is Firebase?
Firebase is a Google-backed application development software that enables developers to develop iOS, Android, and Web apps. It is a pre-configured backend service that makes it easy to integrate with a mobile app using an SDK.
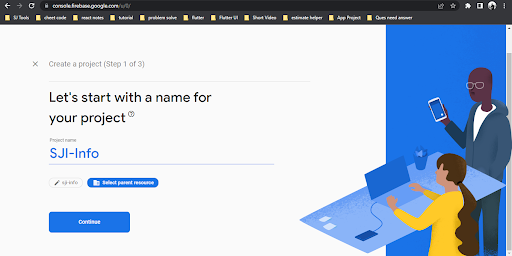
to authenticate our app with Firebase authentication, we need to go to our Google Firebase console and start a new project. Follow this link to go to your Firebase console https://console.firebase.google.com/
After opening your Firebase console click on add/start a new project. You can give any name you wish and press continues.
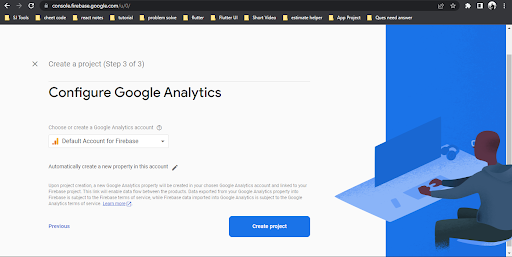
Enable Google Analytics for this project and press continue.

Select Default Account for Firebase and Create Project.
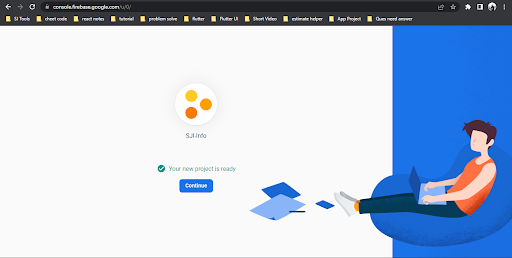
It might take 10–15 seconds and then you will be all set to use Firebase for authentication of your Flutter app and carry out login authentication in Flutter.
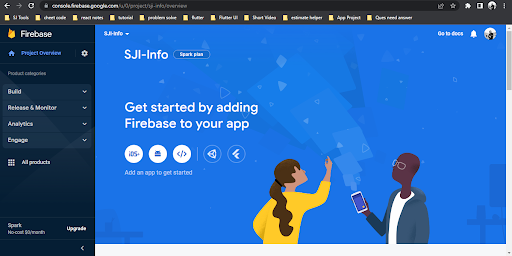
Now, we will learn how to set up our Firebase project for Android. Click on the Android button below on this screen of your Firebase project and you will be redirected to a page to set up your Android application.
It’s crucial to give an Android package name to our Android app. Now remember that Itold you earlier to keep the package name in mind? But wait, if you can’t remember this, we have a way to find this.
Go to the app-level build.gradle file. You need to head over there and locate the applicationId tag in your build.gradle file. That will be the name you need to put in your Android Package name.
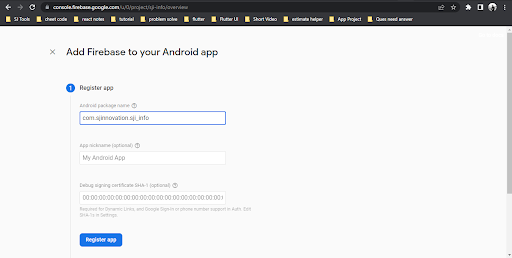
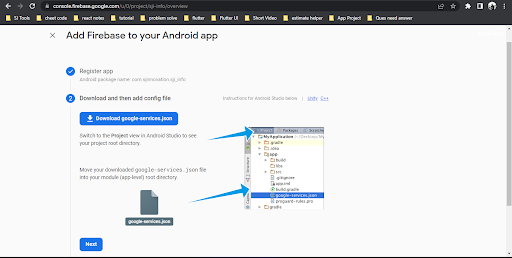
After completing this step, you need to click on Register App. Then you need to download the google-services.json file. Now after downloading this file make sure you drag or place this file in the android/app folder of your Flutter project.
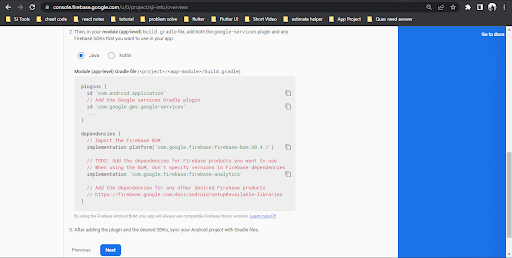
Now there are a few other things we need to do before we are done with the settings of our Android app. Open up your project-level build.gradle, file, and add then copy the dependencies to your build.gradle file.

Then we need to open our app-level build.gradle file and copy and add the dependencies to our app-level build.gradle file. Now, you are all set up to use Firebase authentication in your project.
We will need two modules to use Firebase in your Flutter project for authentication.
- firebase_core- A Flutter plugin to use the Firebase Core API, which enables connecting to multiple Firebase apps. Visit this link to know more about the firebase_core
- firebase_auth- A Flutter plugin to use the Firebase Authentication API. Visit this link to know more about the firebase_auth
Next, we will need to update our pubspec.yaml file and update the dependencies to use these modules. This is how your dependencies should look in your pubspec.yaml file. After updating the dependencies make sure you click on Pub Get.
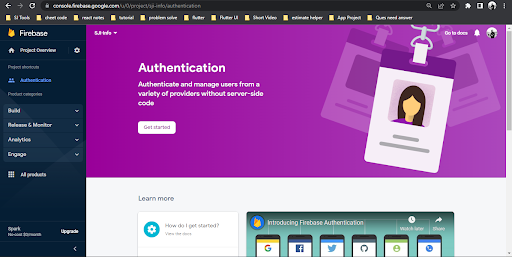
Before going to coding, we need to deal with the Flutter Firebase auth email password! For this, we need to enable the email-password authentication feature from Firebase. Click on Authentication as you see in the below image.
After clicking on it, you are redirected to the next page. Now click on Get Started.
You can see we have lots of options to enable authentication in our app. We have Facebook, Apple, Google, Github, etc. and we can use all of these.

As of now, we will use the simple email-password feature to understand how it works. Click on the Email/Password click the enable button and save it.

We are also going to copy this line — apply plugin: `com.google.gms.google-services`, which implements our Google services json file, and paste it right at the end of our app/build.gradle file.
Also while you are in your app/build.gradle file I would suggest you make a few additions at some places to avoid any error you might encounter in the future while running your app.
First, we will make changes in our default config tag as follows:
defaultConfig {
    // TODO: Specify your own unique Application ID (https://developer.android.com/studio/build/application-id.html).
    applicationId "iamharsh.login_signup"
    minSdkVersion 16
    targetSdkVersion 29
    versionCode flutterVersionCode.toInteger()
    versionName flutterVersionName    multiDexEnabled true //add this line
}
Secondly, we will make changes in the dependencies tag as follows:
dependencies {
    implementation "org.jetbrains.kotlin:kotlin-stdlib-jdk7:$kotlin_version"
    implementation 'com.google.firebase:firebase-analytics'    implementation 'com.android.support:multidex:1.0.3' //add this line
}
Now you are all set up to use Firebase authentication in your project.
We will need two modules to use Firebase in your Flutter project for authentication
- firebase_core- A Flutter plugin to use the Firebase Core API, which enables connecting to multiple Firebase apps.
- firebase_auth- A Flutter plugin to use the Firebase Authentication API.
Now we will need to update our pubsec.yaml file and update the dependencies to use these modules.
dependencies:
  flutter:
    sdk: flutter


  cupertino_icons: ^1.0.0
  firebase_core: ^0.5.3
  firebase_auth: ^0.18.4+1
  modal_progress_hud: ^0.1.3
This is how your dependencies should look in your pubspec.yaml file. After updating the dependencies make sure you click on Pub Get.
In our main.dart file we will be defining the initial route, routes, and navigation for navigating to other pages by using dart maps.
Here’s how our main.dart file would look like-
import 'package:flutter/material.dart';
import 'package:firebase_core/firebase_core.dart';
import 'welcome_screen.dart';
import 'home_screen.dart';
import 'signup_screen.dart';
import 'login_screen.dart';

void main() async {
  WidgetsFlutterBinding.ensureInitialized();
  await Firebase.initializeApp();
  runApp(MyApp());
}

class MyApp extends StatelessWidget {
  // This widget is the root of your application.
  @override
  Widget build(BuildContext context) {
    return MaterialApp(
      initialRoute: 'welcome_screen',
      routes: {
        'welcome_screen': (context) => WelcomeScreen(),
        'registration_screen': (context) => RegistrationScreen(),
        'login_screen': (context) => LoginScreen(),
        'home_screen': (context) => HomeScreen()      },
    );
  }
}
Now we need to design a welcome screen for the user to either direct the user to the login screen page or the sign-up/register screen page.
First, let's take a look at the code for our sign-up screen-
import 'package:flutter/material.dart';
import 'package:firebase_auth/firebase_auth.dart';
import 'package:modal_progress_hud/modal_progress_hud.dart';
import 'rounded_button.dart';

//code for designing the UI of our text field where the user writes his email id or password

const kTextFieldDecoration = InputDecoration(
  hintText: 'Enter a value',
  hintStyle: TextStyle(color: Colors.grey),
  contentPadding: EdgeInsets.symmetric(vertical: 10.0, horizontal: 20.0),
  border: OutlineInputBorder(
    borderRadius: BorderRadius.all(Radius.circular(32.0)),
  ),
  enabledBorder: OutlineInputBorder(
    borderSide: BorderSide(color: Colors.lightBlueAccent, width: 1.0),
    borderRadius: BorderRadius.all(Radius.circular(32.0)),
  ),
  focusedBorder: OutlineInputBorder(
    borderSide: BorderSide(color: Colors.lightBlueAccent, width: 2.0),
    borderRadius: BorderRadius.all(Radius.circular(32.0)),
  ),
);

class RegistrationScreen extends StatefulWidget {
  @override
  _RegistrationScreenState createState() => _RegistrationScreenState();
}

class _RegistrationScreenState extends State<RegistrationScreen> {
  final _auth = FirebaseAuth.instance;
  String email;
  String password;
  bool showSpinner = false;
  @override
  Widget build(BuildContext context) {
    return Scaffold(
      backgroundColor: Colors.white,
      body: ModalProgressHUD(
        inAsyncCall: showSpinner,
        child: Padding(
          padding: EdgeInsets.symmetric(horizontal: 24.0),
          child: Column(
            mainAxisAlignment: MainAxisAlignment.center,
            crossAxisAlignment: CrossAxisAlignment.stretch,
            children: <Widget>[
              TextField(
                  keyboardType: TextInputType.emailAddress,
                  textAlign: TextAlign.center,
                  onChanged: (value) {
                    email = value;
                    //Do something with the user input.
                  },
                  decoration: kTextFieldDecoration.copyWith(
                      hintText: 'Enter your email')),
              SizedBox(
                height: 8.0,
              ),
              TextField(
                  obscureText: true,
                  textAlign: TextAlign.center,
                  onChanged: (value) {
                    password = value;
                    //Do something with the user input.
                  },
                  decoration: kTextFieldDecoration.copyWith(
                      hintText: 'Enter your Password')),
              SizedBox(
                height: 24.0,
              ),
              RoundedButton(
                colour: Colors.blueAccent,
                title: 'Register',
                onPressed: () async {
                  setState(() {
                    showSpinner = true;
                  });
                  try {
                    final newUser = await _auth.createUserWithEmailAndPassword(
                        email: email, password: password);
                    if (newUser != null) {
                      Navigator.pushNamed(context, 'home_screen');
                    }
                  } catch (e) {
                    print(e);
                  }
                  setState(() {
                    showSpinner = false;
                  });
                },
              )
            ],
          ),
        ),
      ),
    );
  }
}
Here we first create a variable _auth for our firebase instance and declare it as final because we won't be changing it at all. This will allow us to work with our Firebase authentication procedure and we can now create a user or sign in a user as we have done in the above code segment we have created a user account, with the function createUserWithEmailAndPassword, and now the user can create an email id and password and password for himself. If there is something wrong while creating an account Firebase will throw an exception
The code for logging in is almost identical only difference is that here we use the Firebase instance to sign the user into our app with the email ID and password he has already created and has registered himself on our app.
Here’s the code for our login screen-
import 'package:firebase_auth/firebase_auth.dart';
import 'rounded_button.dart';
import 'package:modal_progress_hud/modal_progress_hud.dart';
import 'package:flutter/material.dart';

//code for designing the UI of our text field where the user writes his email id or password

const kTextFieldDecoration = InputDecoration(
    hintText: 'Enter a value',
    hintStyle: TextStyle(color: Colors.grey),
    contentPadding: EdgeInsets.symmetric(vertical: 10.0, horizontal: 20.0),
    border: OutlineInputBorder(
      borderRadius: BorderRadius.all(Radius.circular(32.0)),
    ),
    enabledBorder: OutlineInputBorder(
      borderSide: BorderSide(color: Colors.lightBlueAccent, width: 1.0),
      borderRadius: BorderRadius.all(Radius.circular(32.0)),
    ),
    focusedBorder: OutlineInputBorder(
      borderSide: BorderSide(color: Colors.lightBlueAccent, width: 2.0),
      borderRadius: BorderRadius.all(Radius.circular(32.0)),
    ));

class LoginScreen extends StatefulWidget {
  @override
  _LoginScreenState createState() => _LoginScreenState();
}

final _auth = FirebaseAuth.instance;

class _LoginScreenState extends State<LoginScreen> {
  String email;
  String password;
  bool showSpinner = false;
  @override
  Widget build(BuildContext context) {
    return Scaffold(
      backgroundColor: Colors.white,
      body: ModalProgressHUD(
        inAsyncCall: showSpinner,
        child: Padding(
          padding: EdgeInsets.symmetric(horizontal: 24.0),
          child: Column(
            mainAxisAlignment: MainAxisAlignment.center,
            crossAxisAlignment: CrossAxisAlignment.stretch,
            children: <Widget>[
              TextField(
                  keyboardType: TextInputType.emailAddress,
                  textAlign: TextAlign.center,
                  onChanged: (value) {
                    email = value;
                    //Do something with the user input.
                  },
                  decoration: kTextFieldDecoration.copyWith(
                    hintText: 'Enter your email',
                  )),
              SizedBox(
                height: 8.0,
              ),
              TextField(
                  obscureText: true,
                  textAlign: TextAlign.center,
                  onChanged: (value) {
                    password = value;
                    //Do something with the user input.
                  },
                  decoration: kTextFieldDecoration.copyWith(
                      hintText: 'Enter your password.')),
              SizedBox(
                height: 24.0,
              ),
              RoundedButton(
                  colour: Colors.lightBlueAccent,
                  title: 'Log In',
                  onPressed: () async {
                    setState(() {
                      showSpinner = true;
                    });
                    try {
                      final user = await _auth.signInWithEmailAndPassword(
                          email: email, password: password);
                      if (user != null) {
                        Navigator.pushNamed(context, 'home_screen');
                      }
                    } catch (e) {
                      print(e);
                    }
                    setState(() {
                      showSpinner = false;
                    });
                  }),
            ],
          ),
        ),
      ),
    );
  }
}
So with this our procedure of creating a user account on Firebase and signing in the user with his credentials is complete.
Now the only thing left is our home screen where the user will be headed after creating an account or logging in. For the purpose of this article, we will keep our home screen relatively simple and it will have just some normal text welcoming the user.
Here’s the code for our home screen-
import 'package:flutter/material.dart';
import 'package:firebase_auth/firebase_auth.dart';

User loggedinUser;

class HomeScreen extends StatefulWidget {
  @override
  _HomeScreenState createState() => _HomeScreenState();
}

class _HomeScreenState extends State<HomeScreen> {
  final _auth = FirebaseAuth.instance;

  void initState() {
    super.initState();
    getCurrentUser();
  }

  //using this function you can use the credentials of the user
  void getCurrentUser() async {
    try {
      final user = await _auth.currentUser;
      if (user != null) {
        loggedinUser = user;
      }
    } catch (e) {
      print(e);
    }
  }

  @override
  Widget build(BuildContext context) {
    return Scaffold(
      appBar: AppBar(
        leading: null,
        actions: <Widget>[
          IconButton(
              icon: Icon(Icons.close),
              onPressed: () {
                _auth.signOut();
                Navigator.pop(context);

                //Implement logout functionality
              }),
        ],
        title: Text('Home Page'),
        backgroundColor: Colors.lightBlueAccent,
      ),
      body: Center(
        child: Text(
          "Welcome User",
          style: TextStyle(fontSize: 20.0, fontWeight: FontWeight.bold),
        ),
      ),
    );
  }
}
So with this, our app is done and now we can create a user account and sign the user in or sign out.
In the next article, we will discuss how we can sign the user in with his Google account!